$ cd ~/projects/mini-kitchen
Mini Kitchen
Toddler play kitchen with a sink that actually runs. CNC oak plywood, 12 V pump, Python-generated cut sheets.
- maker
- hardware
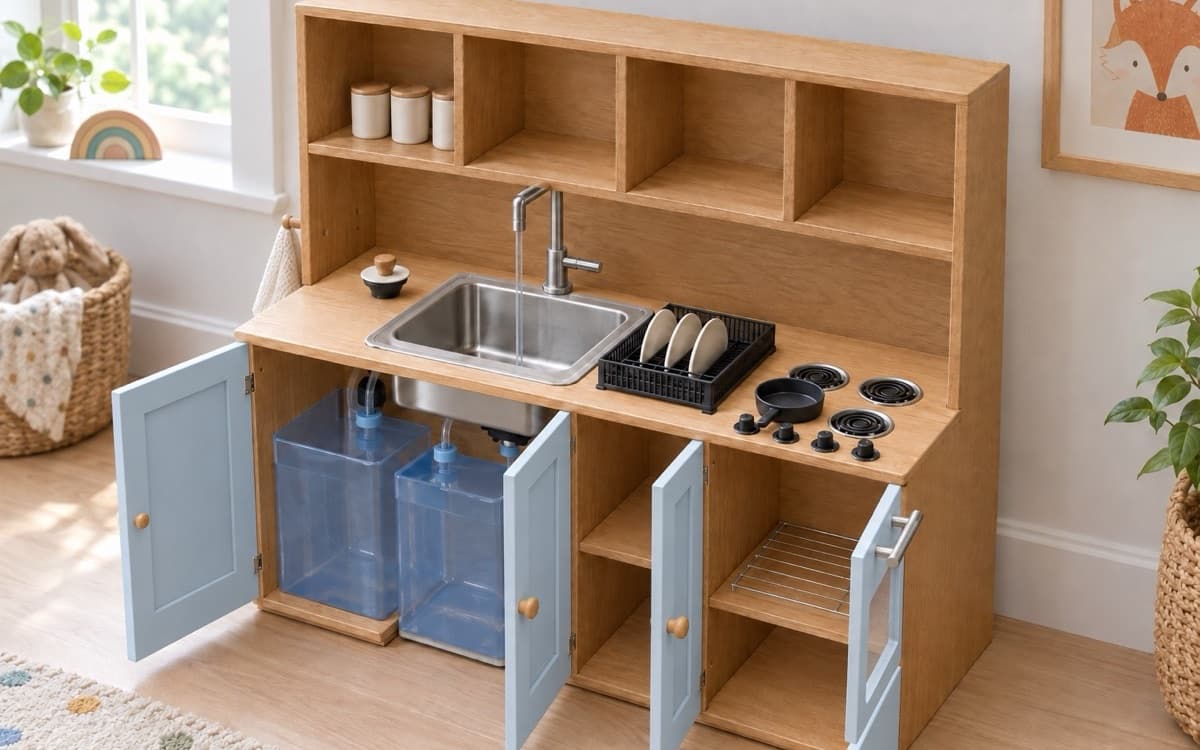
Mini Kitchen
A toddler play kitchen where the tap actually runs. A real stainless sink, a real faucet and a 12 V pump fed from a jug under the counter, plus an oven with a real window, four burners and knobs that turn. CNC-cut from red oak plywood, with the cut list, cut sheets, CNC toolpaths and shop sheet all generated from one Python file.
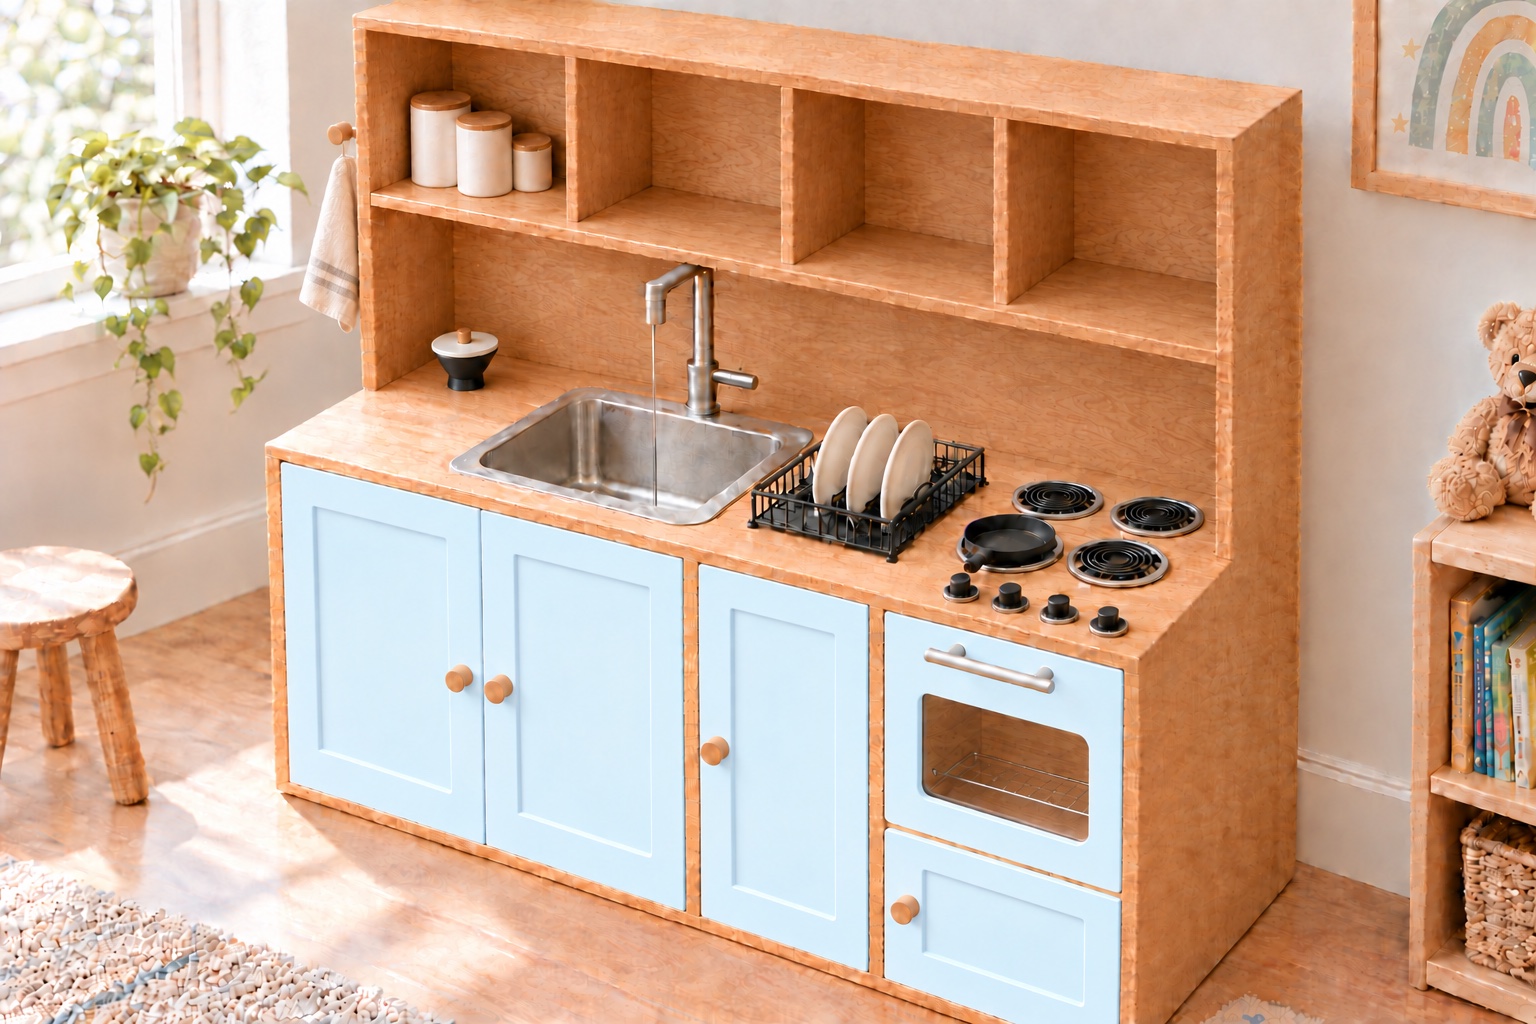
Rendered from the CAD model.
| 📐 Size | 45 7/8 W × 18 D × 45 H in, counter at 23 in |
| 🪵 Stock | Five 48 × 48 in panels of 3/4 in red oak plywood (measured 0.715–0.725 in) |
| 🛠️ CNC | 19 parts, one 1/4 in downcut bit for everything, dado joinery |
| 52 parts, no supports | |
| 💧 Water | 2 jugs, a 12 V demand pump, 2 float switches |
| 🧾 Budget | $824.57 as built, every line itemised in BOM.md |
✨ Highlights
- Water that really runs. An Elkay 15 in drop-in bar sink and a single-handle bar faucet. Open the tap and the pump's pressure switch kicks in; close it and the pump stops. The aerator is set to 0.5 GPM so the sink never fills faster than it drains.
- Clean jug in, dirty jug out. The pump drinks from a 5 gal jug under the sink through a printed pickup foot; the sink drains through a basket strainer and a printed funnel into a second jug. The dirty jug stands in a notch in the floor panel, so it slides straight out the front to be emptied.
- It stops itself. Two side-mount float switches in series on a relay coil cut the pump when the clean jug is empty or the dirty jug is full. Every wire joint lives in a printed wiring box with labelled slots for lever connectors, so there is no crimping.
- She refills it herself. A printed, lidded fill port in the counter drains straight into the clean jug, so a small pitcher is all it takes.
- An oven with a window. A stock 8 × 10 in sheet of 1/8 in acrylic drops uncut into a CNC pocket on the oven door, held by four printed clips, with a stainless bar pull and a wire rack inside. A warming drawer sits below.
- A stove that stays cold. Four printed coil burners in drip pans, and four printed knobs with a captured 8-32 nut that turn on their own axle. Nothing ever heats up.
- Built for a two-year-old. Counter at 23 in, four open compartments at eye level, pale blue Shaker doors, rounded corners, two oak pegs for an apron and a towel, and an anti-tip strap to the wall.
📸 Gallery
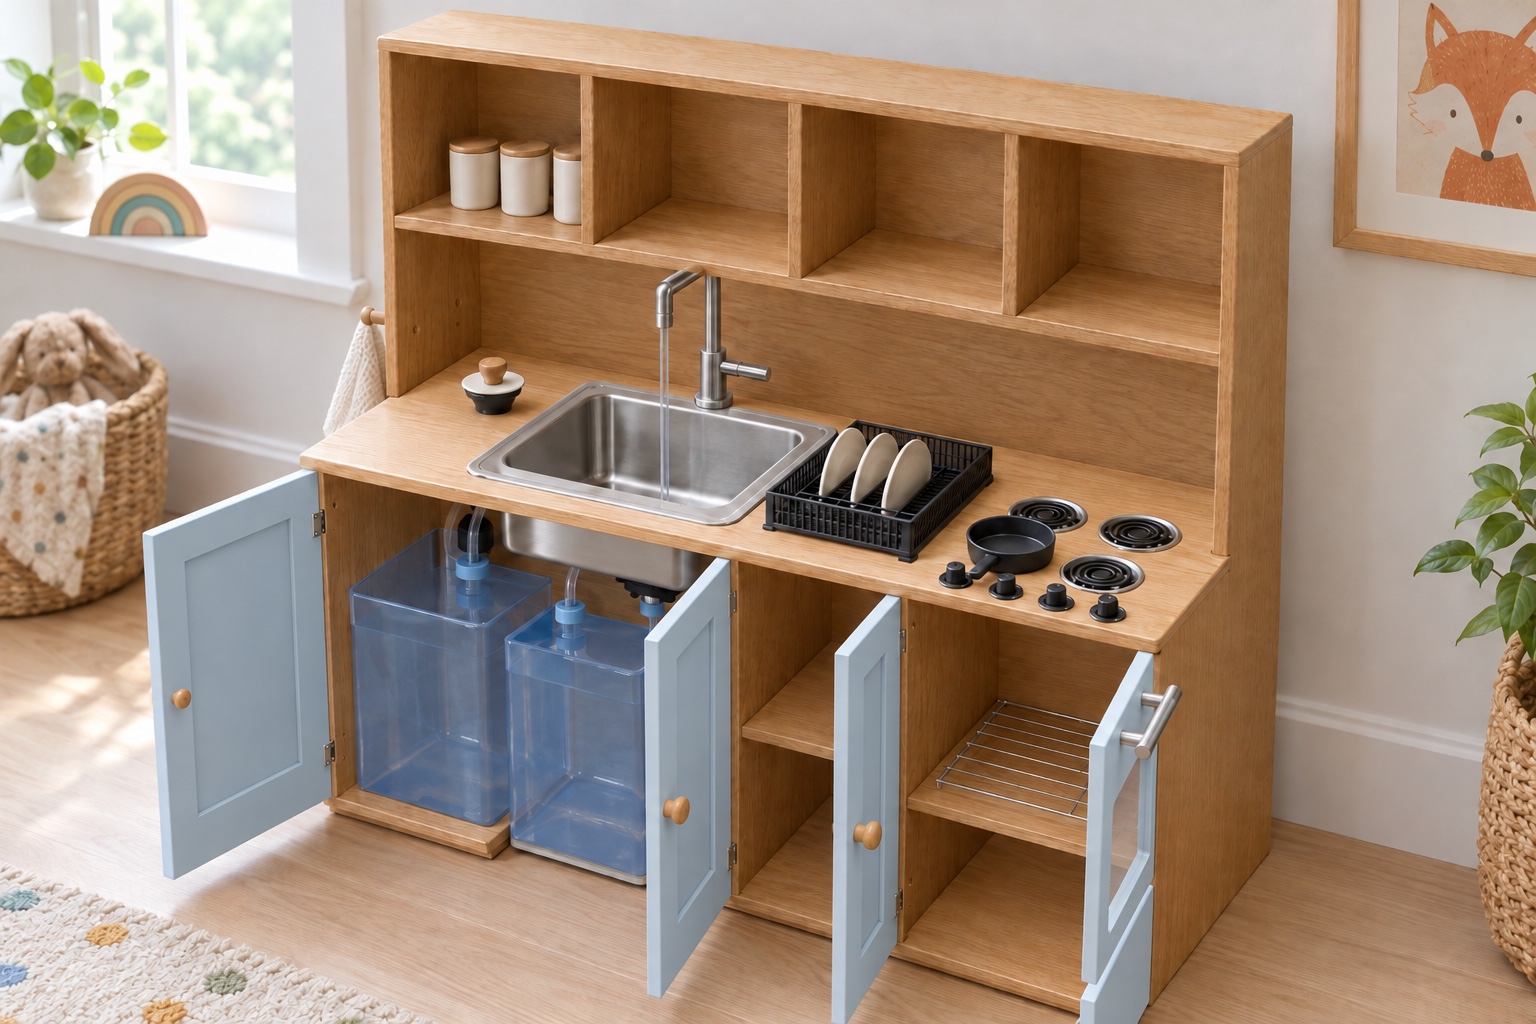 Every door open: jugs and pump under the sink, oven rack, warming drawer. |
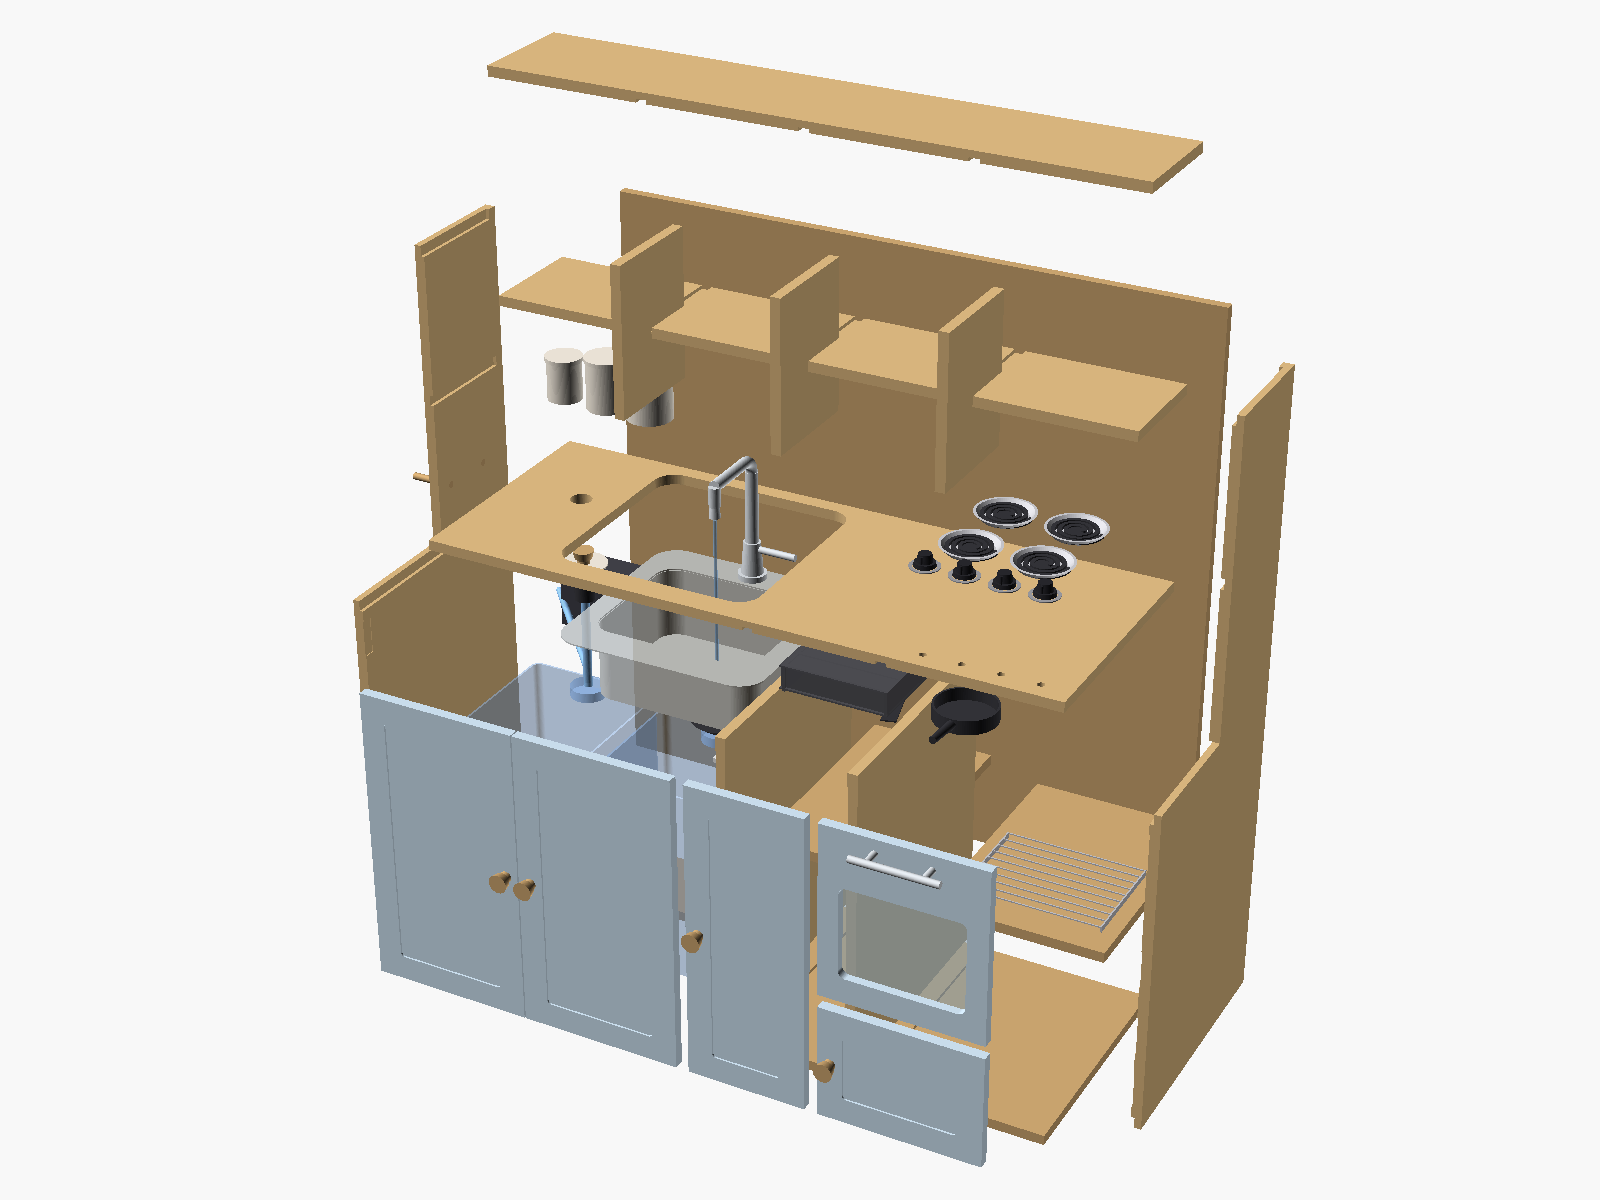 Exploded view from kitchen.scad, bought parts ghosted in. |
 Every coupler from the clean jug to the faucet. |
 12 V supply, relay, pump and both floats in series. |
📦 What's in the repo
| Path | What it is |
|---|---|
shop-sheet.pdf |
Start here. The whole build: budget, cut list, sheet layouts, toolpath order, printed parts, wiring, plumbing, assembly, finish, checklist. |
shop-sheet.html, shop-sheet.css |
The same shop sheet as a web page (Letter print styles included). |
BOM.md |
Bill of materials with store links and prices paid, plus the printed-parts list. |
design.py |
The single source of every number. Stock thickness, bay widths, dado fit, hinge recesses, jug and sink positions. |
kitchen.scad |
OpenSCAD model of the cabinet, in inches. part = "assembly", "exploded", or one panel at a time. |
printed.scad |
OpenSCAD model of every printed part, in millimetres. Pick one with part = "...". |
wire_box_wired.scad |
The wiring box with its connectors in place, for the shop-sheet figure. |
params.scad |
Generated by design.py and included by kitchen.scad. Don't edit it by hand. |
cut-sheets/ |
Five 1:1 SVG cut sheets (48 × 48 in), layered by operation, for any CAM software. |
cnc/ |
Carbide Create .c2d files, one per sheet, toolpaths already set for the 1/4 in downcut bit. template.c2d supplies the stock, machine and feed settings. |
stl/ |
Every printed part as an STL, plus hinge-shims/ (0.4 to 1.6 mm) for a hinge recess cut too deep. |
plates/ |
Two ready-made 3MF print plates: the black stove parts and the silver drip pans. |
gen_*.py |
Generators for the cut sheets, shop sheet, BOM, Carbide Create files and the float, plumbing and wiring figures. |
render.sh, render_parts.sh |
Re-render the OpenSCAD previews used by the shop sheet. |
previews/, *.png, *.jpg, *.svg (root) |
Renders, previews and figures. |
🔁 Change it and regenerate
Everything downstream comes from design.py, so one edit ripples through the model, the cut sheets, the toolpaths and
the shop sheet.
flowchart LR
    D[design.py] --> P[params.scad] --> K[kitchen.scad]
    D --> S[gen_sheets.py] --> CS[cut-sheets/*.svg]
    S --> H[gen_html.py] --> O[shop-sheet.html + BOM.md]
    CS --> C[gen_c2d.py] --> N[cnc/*.c2d]
The scripts use only the Python 3 standard library, so there is nothing to install. Run them from the repo root, in this order:
python3 design.py params.scad && python3 gen_sheets.py && python3 gen_html.py && python3 gen_c2d.py
The figures have their own scripts:
python3 gen_float_fig.py && python3 gen_plumbing_fig.py && python3 gen_wiring_fig.py
To re-render the OpenSCAD previews (macOS, expects OpenSCAD 2021.01 in /Applications):
./render.sh        # cabinet views, exploded view, burner, toys, wired box
./render_parts.sh  # one PNG per printed part
To print a part, open printed.scad, set part (and size for the canisters and lids) and export to STL; the
header of the file lists every part with its quantity and print orientation.
[!IMPORTANT] Measure your plywood with calipers before you cut. Set
TandT_MAXindesign.py, regenerate, cut a test dado on an offcut, and run the Carbide Create simulation before any sheet goes on the machine.
🪚 How it goes together
The shop sheet has the full, step-by-step version. In short:
- Cut. Five sheets (
S1sides,S2back,S3counter, bottom and top,S4dividers and shelves,S5doors and upper shelf), in a fixed order: dados and rabbets, hinge recesses, Shaker panels and the window pocket, holes, inside profiles, then outside profiles on tabs. - Print the 52 parts: burners, knobs, toys, the fill port, pickup foot, drain funnel, window clips and the wiring box.
- Dry fit, then glue and screw. Every panel sits 1/4 in into a dado or rabbet in its neighbour, glued with Titebond III and clamped by three #8 × 1 1/4 in screws per joint. Heads on the outside faces and the top get oak plugs.
- Band and finish. Oak edge banding on every visible edge, three or more coats of poly on the oak, primer and two coats of pale blue enamel on the five doors, and a week's cure before any water.
- Hang the doors on butt hinges seated in CNC recesses, with a 3/32 in reveal.
- Plumb and wire. Sink, faucet, pump, jugs, floats, tubing and the wiring box.
- Strap it to a stud. Then let the kid loose.
🧾 Materials
The full list, with links, quantities and notes, is in BOM.md. As built:
| Category | Subtotal (USD) |
|---|---|
| Wood and finish | 351.83 |
| Fasteners | 30.82 |
| Doors and hardware | 23.65 |
| Sink and faucet | 155.72 |
| Water | 101.73 |
| Electrical | 71.12 |
| Oven, stove and dishes | 52.18 |
| Safety | 11.58 |
| Tax (Amazon orders) | 25.94 |
| Total | 824.57 |
Amazon prices are what was paid in October 2026; Home Depot prices are before tax. Polyurethane, sandpaper, PTFE tape and filament are assumed on hand.
⚠️ Safety
- Strap it to the wall. A 45 in hutch with a toddler on the oven door is a ladder; the strap in the BOM runs from the back of the cabinet to a wall stud.
- Low voltage only. The pump runs on a 12 V supply that stays outside the cabinet, and its plug is the adult off switch.
- Play water, not drinking water. Tip the dirty jug out after play and leave the sink doors open to dry.
- Nothing heats up. The burners and knobs are printed plastic.
more projectsls ~/projects
~/ai-desloper
Desloper scores how generic an AI-written landing page is against eight principles, with deterministic detectors plus a model judge, then hands you a fix prompt built from the findings you keep.
~/mark85
Iron Man suit firmware: four limb IMUs drive synthesized stereo servo whir and repulsor charge-up.
~/claude-tts
Claude Code narrates its work out loud with offline neural TTS. Piper + FFmpeg, driven by hooks.
~/claude-usage-widget
Your Claude Code limits as Apple-Watch-style activity rings, with a forecast of when you'll hit them.
~/speedster
A focused, dark-mode Rubik's cube timer for iOS: scrambles, rolling averages and progress charts.
~/age-of-potatoes
The source behind ageofpotatoes.com, golden-file tests for the deterministic sim included.